Enrolling ASSA ABLOY IP locks connected to the Synergis Cloud Link
unit
2025-07-15Last updated
For the Synergis™ Cloud Link unit to communicate with the ASSA ABLOY
IP locks connected to it, you must pair them together in the Synergis™ Appliance Portal using the lock pairing mode.
Before you begin
Configure the IP locks using the Lock Configuration Tool (LCT). If encryption is
enabled, write down the Lock AES Key.
What you should know
When the lock pairing mode is active, all the IP locks that are connected to the
Synergis Cloud Link unit using the specified communication ports are
discovered. After the pairing mode ends, the Synergis Cloud Link unit
reconnects to the Access Manager in Security Center, and adds the paired IP
locks.
Procedure
Log on to the Synergis Cloud Link unit.
Click Configuration
> Hardware.
At the top of the Hardware column, click
Add ().
From the Hardware type list, select Assa Abloy
IP.
(Optional) In the Timeout field, select how long to activate
the lock pairing mode for. New IP lock connections are only paired for the amount of
time that you specify.
Note:
Back up the Synergis Cloud Link unit's configuration file in case
you need to replace the unit at some point, especially if you have many Wi-Fi
locks, since they take longer to re-enroll.
If you’re using a port other than the default 2571, in the TCP
port field, enter the communication port you configured on the IP
locks.
If you enabled encryption through LCT, in the AES site key
field, enter the AES key (32-character hexadecimal string) configured on your
lock.
Note:
You can modify or remove the AES key from the Hardware
page of the Synergis Cloud Link unit in Config Tool.
(Optional) If you want the IP locks to be added as they are discovered, do the
following:
Select the Add locks upon discovery option.
Important:
When this option is selected, the Synergis Cloud Link unit reconnects to the Access Manager after each
group of IP locks is added. This option is only recommended if you must
start configuring the IP locks before the pairing mode is complete.
From the Delay before adding locks option, select how
many seconds must pass before the previously discovered locks are added.
Click Start pairing.
Important:
For Wi-Fi locks, press the COM or Reset button inside the back
panel of the lock to trigger a connection to the Synergis Cloud Link
unit.
To stop lock pairing mode and add the discovered locks, click Stop
and save.
To cancel lock pairing mode, click Cancel.
Note:
If the
Add locks upon discovery option is selected, some
locks might have already been added.
Wait until the lock pairing mode times out.
The Synergis Cloud Link unit reconnects to the Access Manager role,
and the discovered locks are added.
Click Configuration
> Hardware.
The IP locks that were added are displayed on the hardware configuration
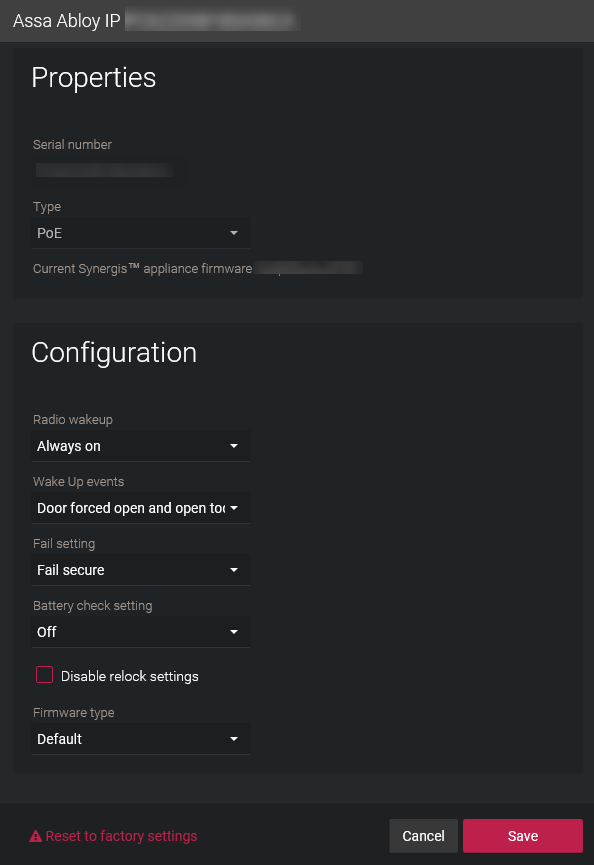
tree. When you select a lock, the unit type, serial number, and lock firmware of the
selected IP lock are displayed under Properties.
If no information is displayed under Properties, refresh the
page.
For Wi-Fi locks, it can take up to 2 minutes before the information is displayed
under Properties. Wi-Fi locks appear in red in the hardware tree
because they aren’t in constant communication with the Synergis Cloud Link unit.
For PoE locks: Under Properties, make sure that
Radio wakeup is set to Always
on so that Access granted events are never missed in
Security Desk, and set
Battery check setting to
Off.
For Wi-Fi locks: Under Properties, make sure that
Radio wakeup is set to Daily,
and enter the time of day (Hour and
Minute) when it should occur.
Select Local time if you want the radio wake-up time
to follow the time zone of the Synergis Cloud Link unit. If you
don’t select this option, the default is UTC.

 ).
).