Enrolling Allegion Schlage AD locks and PIM modules on the Synergis Cloud Link
unit
2025-12-08Last updated
Because the Synergis Cloud Link unit doesn’t communicate directly with
Allegion Schlage AD locks or PIM400 modules, you must enroll these devices through a Mercury EP,
LP, MP, or Honeywell controller, using Config Tool.
Before you begin
Configure a different RS-485 address on each Schlage device (AD Series lock and PIM400
module) using the Schlage Pidion handheld device, and connect the lock and module to your
Mercury controller. For more information, see the Schlage Utility Software User
Guide.
Mercury controllers enrolled on a
Synergis Cloud Link unit are not visible from the Synergis Appliance PortalHardware page.
On the
Synergis Cloud Link unit, each Mercury controller must be assigned a unique
channel ID. All Mercury controllers have RS-485 buses to which the Schlage devices (AD-300
and PIM400) are connected. Each Schlage device connected to the same RS-485 bus must have a
unique RS-485 address.
Limitation:
Allegion Schlage locks enrolled under Mercury controllers have limited functionality. They support only factory default settings and configurations available through the Schlage Home app. For example, they do not support a persistent LED indicator for the locked state.
Procedure
From the Config Tool homepage, open the
Access control task.
Click Roles and units, and then click the Synergis Cloud Link unit.
Click Peripherals, and then click Add an
item ().
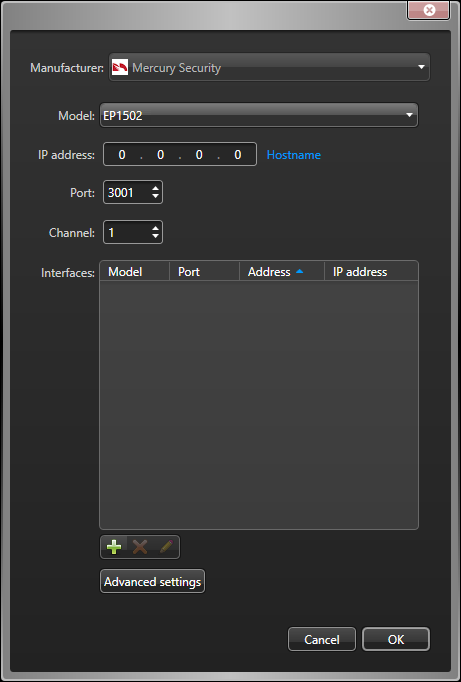
Enter the following information:
Model
Model of the controller.
IP address
Static IP address assigned to the controller by your IT department.
Hostname
Click the blue link to identify the controller by its hostname. This option is
only available if you’re running Security Center 5.12.0.0 or later.
Note:
When
enrolling a Mercury controller with its hostname, you must append the hostname
with .local if the controller is not registered to DHCP and
DNS on the network.
Port
Communication port. The default value is 3001. The port must match the value
configured on the Mercury Device Manager web page.
Channel
Channel ID corresponding to this controller. The channel ID can be any value 0 -
63, and must be unique within the Synergis Cloud Link unit. After it’s
assigned, it must not be changed.
Add the Allegion Schlage devices that are connected to your Mercury controller.
Under the Interfaces list, click Add an
item ().
In the dialog box that opens, select the Model (AD-300 or
PIM400), the Port, and the Address (0 -
31).
(PIM400 only) In Low, enter the first door number linked to
the PIM400, and in Count, enter the number of doors linked to
the PIM400.
All door numbers ranging from Low to
Low+Count must correspond to an AD-400
wireless lock.
Click OK.
Repeat as necessary.
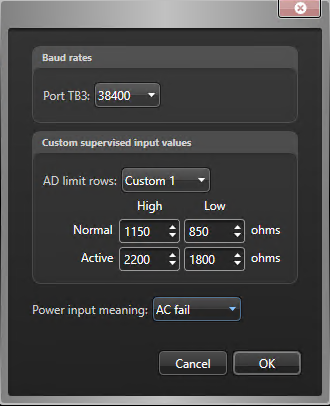
(Optional) Click Advanced settings to change the advanced
settings.
The available settings depend on the selected controller model. You can typically
change the baud rate of the available serial port, the custom supervised input values, and
the power input event configuration.
Note:
You can set up to four different custom presets on your Mercury controller's
inputs. For users upgrading from earlier Security Center versions who have a custom value
configured, that preset is listed as Custom 1 in the
AD limit rows list.
Click OK at the bottom of the dialog box.
Click Apply.
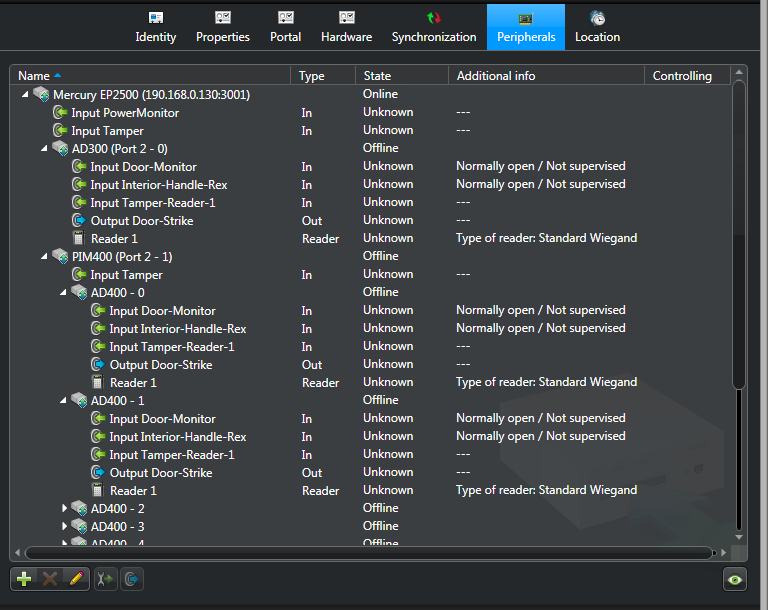
The Mercury controller with all its connected downstream panels and peripheral
devices are listed on the Peripherals page.Adding interface modules to the Synergis Cloud Link unit causes the
unit to perform a software restart. During this process, the Synergis Cloud Link unit and all peripherals attached to it are displayed in
red.

 ).
).
 Note:You can set up to four different custom presets on your Mercury controller's inputs. For users upgrading from earlier Security Center versions who have a custom value configured, that preset is listed as Custom 1 in the AD limit rows list.